Feature: 
Global Menu


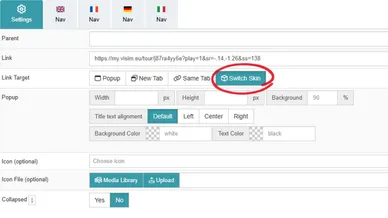
Many spaces, just one Menu!


Larger virtual tour projects often involve multiple Matterport scans - without consistent navigation, this can quickly feel disjointed.


With the Global Menu however, you can designate a skin as the master skin and apply its menu settings to all the others. This means that you don't have to create the same menu structure multiple times, saving you time and effort!

Skin Switch in the Menu

With the Global Menu, a skin is designated as the master skin, and its menu is applied to all other skins in the project. Switching between the individual skins is easy thanks to submenus and deep links within the menu.


This ensures a consistent, clear, and seamless user experience - even for larger multi-tour projects!

Skin Switch for Click Actions

However, the Skin Switch isn't just available in the menu, it can also be used in all click actions within MPskin!


This allows you to easily integrate skin changes into various interactions (like VS, Sweep Actions etc.) and incorporate them even more seamlessly into the tour experience.

Skin Switch via URL Parameter

In addition, the URL parameter “skinSwitch=1” can be used, for example in hyperlinks within text tags.


This allows skin changes to be triggered directly via a link and makes them particularly easy to integrate into existing content and custom designs.

FAQs about the Global Menu

What is the "Global Menu"?

A global menu means that you define a “master skin” whose menu structure is used across multiple skins - ensuring a consistent menu and reducing the amount of backend work.

How do I set up the Global Menu?

In short: Select the Master Skin → Build the menu there → Create deep links to the other skins → Set all deep links to “Switch Skin.” 
Check out our tutorial for more help!

What happens to the Skin Tags when I use the Global Menu?

If a tag block is used in the menu within the master skin, the tags are automatically updated based on the skin when you switch - so you always see the tags for the active skin.
 

Please note that all desired tags or tag categories must still be added to the menu in the respective skins. You can simply create a menu block for each skin in which the desired tags are listed. This also allows you to list only certain tags for each skin instead of all tags.

Do I still need to create tags in every skin?

Yes – the tag content remains part of the respective skin. The Global Menu “only” ensures that the tag list in the menu automatically matches the current skin. Be sure to create a menu block in EACH involved skin, listing the Tags you wish to display for that Skin.

Can I play highlightreels across multiple skins?

Yes. You can link highlight reels across skins by configuring an “External Link” click action in the last reel item, entering the share link of the next highlight reel as the link, and setting the target to “Switch Skin.”


Note that (as with tags) you must first create a highlight reel in each skin involved.

Can I still have different content for each skin?

Yes. You get a consistent menu framework, but each skin can still have its own tags, VS content, and highlight reels.

Global Menu Tutorial

Start your creative journey with MPskin!