
The general guide on how to set up your AR-Tour can be found here: Augmented Reality - MPskin
Please note that currently, only the MPskin account owner can create new AR-Tours!
Once the Tour has been created, sub-users can access the AR-Tab and the AR-QR-Codes.
After the creation of the AR-Tour, the „State“ column will display the current state of the project.
At the start, it will indicate „mp-start“. When the state shows „ready“, the AR-Tour is ready for use!
Other states you may see in between those two mentioned above include:
„Matterpak download started/done"“, „Cloud upload started/done“, „Awaiting generation“, „Generation in progress“ and „Finalization in progress“. These states do not indicate any issue with the project.
Error codes will display as „cloud-error“ or „mp-error“.
We will get notified of these errors and fix them accordingly, you do not need to contact us in these cases.
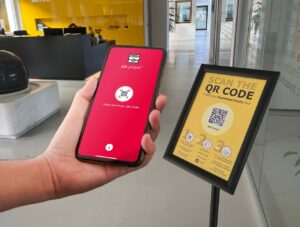
The QR-Code, once positioned on-site, can either be scanned directly in the standard phone camera or in the AR-player app.
If a user does not yet have the AR-player app installed, they will be led to the app/play store to download the AR-player app. After successfully downloading it, the QR-Code can be scanned again.
If the AR-player app is already installed, it will go directly to opening the AR-tour.
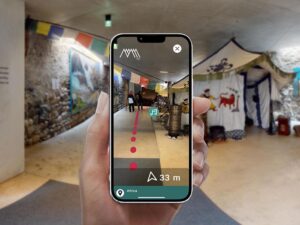
If the AR-player loses connection while being used on-site, users will see the “swing left and right to locate” message again.
In future updates, we will be implementing a “Tour Library” that allows users to save previously scanned AR-Tours, removing the need to re-scan QR-Codes if the app is started while users are not near any QR-Code.
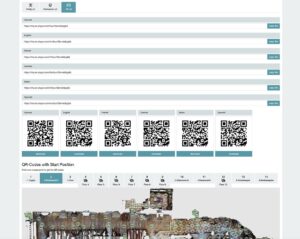
Under “Share < AR url” you will find several QR-Codes for your AR-tour, as well as standard URL links.
The URL links can be used to create your own custom QR code, for example if your client would like a custom design that includes a logo.
The standard QR-codes can be found below – there will be one QR code shown for every selected language, as well as one general QR-code that lets users select their language of choice in the AR-player app.
Under “QR-Codes with Start Position”, you can generate QR-Codes that contain information on the location of the QR-Code. You can click any of the sweep points in the tour to generate the corresponding QR-Code. This QR-Code will recognize any starting position within 5-6 meters of the selected sweep point, so it does not have to be scanned at the exact location of the sweep point.
We recommend using these QR-Codes instead of the general QR-Codes, because they help decrease the time it takes for the AR-player to recognize the starting position of the tour.
This is particularly useful for large spaces! With the general QR-Code, the larger the space, the longer it will take the AR-player to recognize the location the QR-Code has been scanned at.
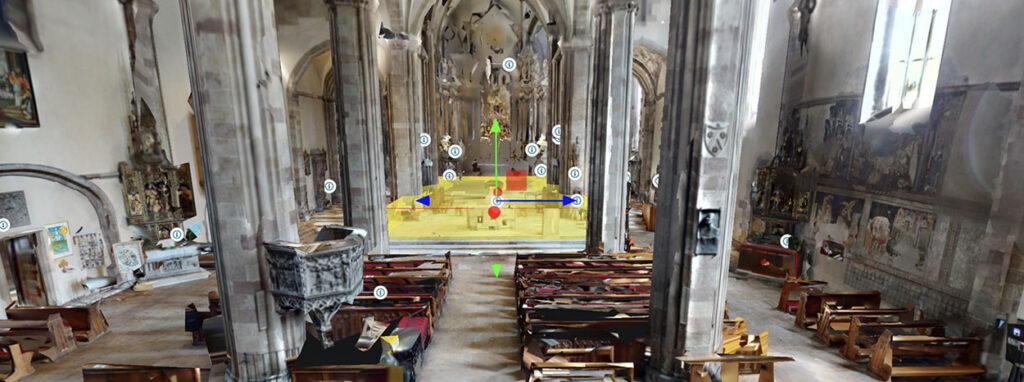
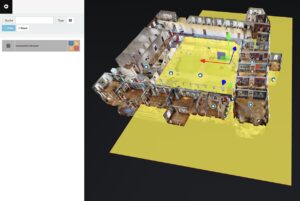
In general, our Wayfinder is based on the Mesh (the 3D-Data) of the tour. The Wayfinder always takes the shortest route to the chosen destination, based on the available Mesh in the Tour. It can be triggered by clicking on a Tag or Deeplink in the Menu, or by clicking a Deeplink in a Tag.
The Menu can be opened by clicking on the Symbol at the top right of every AR-Tour (Burger-Menu).
Errors in the Wayfinding path may occur if there are holes or gaps in the Mesh – for best results, make sure that you have sufficient scan points in your tour. Keep in mind that the mesh of tours created with the Pro3 camera is superior to tours created with a Pro2 or other cameras. Cameras that use LIDAR-laser provide the best 3D data.
Depending on the layout of the space, the Wayfinder might have issues maintaining navigation over several floors. We recommend placing QR-Codes, ideally with the Starting Position, on each floor, in case the Wayfinding is lost.
The Wayfinder is currently unable to recognize elevators as a navigable path, we recommend placing QR-Codes next to the elevator on the different floors.
By making use of our AR-Editor, you can block certain areas of the tour for the Wayfinder, more information on this below!
Once a skin has been activated for AR, you will be able to access the AR-tab in the skin.
In there, you will find the AR-Editor. The AR-Editor allows you to place blockades in the tour, the Wayfinder will not navigate wherever blockades are placed. This allows you to either block entire areas or create a predetermined path for the Wayfinder.
The AR-Blockers can also be used to “fix” certain issues the Wayfinder might have.
For example: If there is a gap in the Mesh on a certain floor, the Wayfinder might try and lead users “through the ceiling” – this can be fixed by placing a large, flat AR-Blocker between floors, leaving out a gap where the staircase is.
We recommend placing an AR-Blocker between all floors, as holes in the Mesh are common (especially in larger spaces) and might lead to issues for the Wayfinding.
Later on, we will also be implementing a “Waypointer” that allows you to “enable” certain pathways for the Wayfinder. This will be used, for example, for narrow stairs, paths or holes in the Mesh that the Wayfinder does not recognize as a walkable path.
Please note: Virtual Staging objects are not visible in the AR-Editor for better usability.
The largest contributing factor to the crashing of tours is a lack of (available) RAM. In general, iOS devices tend to have less RAM than Android devices.
In order to improve the stability of the AR tour, there are a few things to keep in mind:
- When possible, use PNGs instead of SVGs as they require a lot of RAM, especially when there are several SVGs in one tour
- When possible, use MP4s instead of GIFs - similar to SVGs, GIFs require a lot of RAM
- When using 3D objects, make sure they are exported in power of twos (512x512, 1024x2048 etc.) and are as compressed as possible
- The use of AR requires a mobile phone with certain technical specifications. If the device does not have a 3D sensor (for exmple LiDAR, gyroscopes, accelerometers), it cannot use any AR applications.
The following list serves as a rough overview of features we have already planned, but not yet implemented. This list might be subject to changes and will be updated over time.
- AR-Waypointer – manually adding/defining a walkable area for the Wayfinder
- Icon size settings
- Support for animated 3D Virtual Staging objects
- Support for Green Screen Videos/Color Filter
- AR Tour Library in the AR-player
- App-Whitelabeling – customizing the AR-player’s Logo and brand color
- Multilingual Support for the AR-player app
- Optimization for Tablets
- Password Protection for AR-Tours
- Entry-Popup in AR-Tours
- Settings for Metric/Imperial